Melissa's Cuisine: June 2012

Saturday, June 30, 2012

Foodie Pen Pal

I absolutely adore receiving mail.  Ask Mike--when I know there is a package scheduled to arrive for me, I'm anxiously tracking it online (when possible) and checking the mailbox to see if anything's arrived yet.  I love the suspense of not knowing what's in certain packages--like those I receive as part of the Foodie Pen Pals Program.
The Lean Green Bean

This month I received my package from a reader, Kim, who happens to live on the East side of our great state.  She sent me a fantastic package filled with delicious foods--all new to me!

These chocolate covered fruit bites were amazing!  I loved them so much that I went online to see where I could buy some.  I couldn't get the small packages like this around here, but I found a large package at Walmart--sooo yummy!

These fruit strips were perfect for a mid-morning snack.  They fit perfectly in my purse and each strip is 1/2 a serving of fruit.  It's a great healthy snack.  I loved the apricot flavor!
Kim sent me a European chocolate bar--I haven't tried it yet, but it looks delicious.  The almond thins also look delicious, but I haven't opened them yet--I'm saving them for our camping trip!  I did eat the Greek Yogurt bar with lunch the other day--it was delicious!

Mike was really excited to see this stick of salami.  We're big fans of sausage and cheese with crackers.  I can't wait to try this!

I also received some Black Fig Vinegar, Apple pop, and mild green Tabasco.  We had a Mexican dish the night my package arrived so we topped it with the Tabasco and it was delicious.  The pop is currently chilling in my fridge--I'm waiting for my next Mexican food night to enjoy it.  (Kim says she enjoys hers with Mexican food).  I'm looking for a good recipe to use the Black Fig Vinegar in--any suggestions are welcome!
Thank you, Kim, for introducing me to a great selection of delicious foods.  I've loved everything I've tried, and I can't wait to try the rest!

To see the package of Farmer's Market treats I sent to Meg, visit her blog here.
Thank you, Lindsay, for your hard work each month.  This program is so fun!
If you're interesting in joining Foodie Pen Pals, here's some important information for you:
-On the 5th of every month, you will receive your penpal pairing via email. It will be your responsibility to contact your penpal and get their mailing address and any other information you might need like allergies or dietary restrictions.
-You will have until the 15th of the month to put your box of goodies in the mail. On the last day of the month, you will post about the goodies you received from your penpal!
-The boxes are to be filled with fun foodie things, local food items or even homemade treats! The spending limit is $15. The box must also include something written. This can be anything from a note explaining what’s in the box, to a fun recipe…use your imagination!
-You are responsible for figuring out the best way to ship your items depending on their size and how fragile they are. (Don’t forget about flat rate boxes!)
-Foodie Penpals is open to blog readers as well as bloggers. If you’re a reader and you get paired with a blogger, you are to write a short guest post for your penpal to post on their blog about what you received. If two readers are paired together, neither needs to worry about writing a post for that month.
-Foodie Penpals is open to US & Canadian residents. Please note, Canadian Residents will be paired with other Canadians only. We've determined things might get too slow and backed up if we're trying to send foods through customs across the border from US to Canada and vice versa.
-Visit The Lean Green Bean for more details!

Thursday, June 28, 2012

Pesto Pasta with Peas and Sundried Tomatoes


It's summer time and if you're anything like me, that means a lot of grilling, outdoor eating, and get-togethers with family and friends.  It's been a while since Mike and I have had a free weekend, and our schedule doesn't appear to be opening up any time soon.  Whether we are having company over to our house, or going to someone's house for dinner, I prefer to limit my time spent in the kitchen--it's too hot to spend hours cooking! 

Salads are perfect for hot summer days.  I love a good pasta salad--it's great as a side dish, and I enjoy taking the leftovers to work for lunch.  I made this pasta salad for a work party.  We were sending our interns off and celebrating a fantastic year with them.  Because of the incredible amount of food at the party, I ended up with a good amount of leftover pasta salad.  My boss loved it so much that she asked me to bring the leftovers to work.  She enjoyed this pasta salad for lunch a couple of times!

I used sundried tomatoes from Enduring Sun in this recipe.  They were incredible--so sweet they tasted like candy!

Pesto Pasta with Peas and Sundried Tomatoes

Serves 8-10

You will need:
1 (16 oz) box whole wheat pasta shells
1 cup sundried tomatoes
2/3 cup frozen sweet peas
1/3 cup pesto
1/8 cup extra virgin olive oil
salt and pepper to taste

1.  Cook the pasta shells to al dente, following the directions on the box.

2.  Drain noodles and transfer to a large bowl.

3.  Stir in sundried tomatoes, sweet peas, pesto, olive oil, salt and pepper while the pasta is still hot.

4.  Serve the pasta immediately or chilled.

Source:  Eat Yourself Skinny

Tuesday, June 26, 2012

Peanut Butter and Oatmeal Dog Biscuits

It's a special day around our house today!  We're celebrating a birthday!  Finally someone in our family has a summer birthday (Mike and I have winter birthdays).  Today, our baby puppy is 1 year old!  It's incredible how time has flown by since we rescued him.  We adopted Champ last September.  He weighed just 16 pounds.  Now, he's a year old and weighing in at 62 pounds.  He's a bundle of energy and we spoil him like crazy!
Champ when he was a puppy

"Mommy, can I have a cookie?"
In honor of his birthday, I decided to make some special treats.  I wanted something pet-friendly, but also something that was special for him.  I turned to one of my favorite blogs, and I knew that if her fur baby enjoyed this treat, mine would too.  Champ loved this snack--I snuck him a little piece of the raw dough when I was making this yesterday and he gobbled it right up!  Champ loves peanut butter--I think he takes after his mommy :)
Can you see the biscuit in his mouth?  He carries large pieces of food around before eating them!
Peanut Butter and Oatmeal Dog Biscuits

Makes 13

You will need:
2 Tablespoons flaxseed meal
1 Tablespoon olive oil
1 cup water
1/2 cup peanut butter
1 cup oatmeal
2 cups flour

1.  Mix all ingredients together until a dough is formed.  Add more flour or water if necessary.

2.  Roll dough into 1-1/2" balls and place on a greased cookie sheet.  Press down gently to flatten biscuits.

3.  Bake at 300 for 20 minutes.  Turn off the oven and leave the treats in it for several hours to harden.

Source: Culinary Concoctions by Peabody

Friday, June 22, 2012

Grilled Chicken Gyros

In December, Mike and I were in Toronto with my family and we stopped at a tiny restaurant for lunch.  I ordered a shawarma and I was immediately enthralled with the taste.  I couldn't stop thinking about them after we returned home and I told Mike that we needed to find a place nearby that we could get shawarmas.  I couldn't find a shawarma joint, but I was able to find a (tiny) restaurant that sells gyros.  There's a slight difference between a shawarma and a gyro, but I was thrilled to find a similar restaurant.  The food is incredible, and I've told a few people about this little hole-in-the-wall restaurant that they must visit!  A couple weeks ago, a new Mediterranean restaurant opened up in my home town.  Mike and I ate there one day and were thrilled with the flavors of the gyros we enjoyed. 

I've been so obsessed with gyros lately that I decided I must try to make them at home.  When I selected my Secret Recipe Club recipe for June, I knew that I would use the Man'ooshe Lebanese Flatbread to make gyros.  I found a fabulous Tzatziki sauce and I knew I had the makings of a fabulous dinner. 

Mike and I invited some of our best friends over for supper (and a campfire in our new fire pit!) last Saturday night.  My friend, Alecia, visited Greece while studying abroad in college, and said she ate gyros everyday when she was there.  She took a bite out of her gyro and said that it tasted just like what she ate in Greece.  She said it brought back a lot of memories.  And then, she asked for my recipe.  I would say this recipe was a grand success!

Grilled Chicken Gyros

Serves 4-6

You will need:
4 large chicken breasts, cut into strips
4 Tablespoons lemon juice
2 teaspoons curry powder
4 Tablespoons olive oil
2 teaspoons salt
1 teaspoon ground cumin
4 garlic cloves, minced
4-6 flatbreads
Tzatziki sauce
diced tomatoes
sliced pickles
diced onions

1.  In a small bowl, combine lemon juice, curry powder, olive oil, salt, ground cumin, and garlic. 

2.  Place chicken strips in a large Ziploc bag and pour the marinade over it.  Seal bag and toss to coat.

3.  Refrigerate chicken in marinade for 3-4 hours (the longer the better!).  Remove chicken from the fridge about 20 minutes before grilling. 

4.  Place chicken strips on a pre-heated grill.  (You can skewer the chicken strips, or use a grilling basket, if desired). 

5.  Grill chicken for 4 minutes on each side, or until chicken is fully cooked.

6.  Top each flatbread with a scoop of Tzatziki sauce, then top with grilled chicken, tomatoes, pickles, and onions.

Wednesday, June 20, 2012

Tzatziki Sauce


I love cucumbers.  The smell and taste of them makes me think of summer.  I enjoy eating them raw, but also in salads and on sandwiches.  I'd never had Tzatziki sauce before (to my knowledge), but I knew I would enjoy it because of the cucumber.  Tzatziki can be used as a sauce on gyros, as an accompaniment to meat, or as a dip for pitas or fresh vegetables.  It has so many possibilities and it's so delicious!

As promised on Monday, this is the sauce I used for our flatbreads. I'll be sharing the rest of the filling on Friday. Patience my friends...

Tzatziki Sauce

Makes 1 cup

You will need:
1 cup plain Greek yogurt
1/2 of a large cucumber
1/2 teaspoon salt
1 Tablespoon olive oil
2 cloves garlic, minced to a smooth paste

1.  Scoop yogurt into a small bowl and mix until smooth.

2.  Peel cucumber and grate it into fine pieces.  Place in cheesecloth and squeeze to remove the water.

3.  Add the cucumber, salt, olive oil, and minced garlic to the yogurt and mix well.

4.  Cover bowl and refrigerate for at least 1 hour before serving. 

Source: Simply.Food

Monday, June 18, 2012

Man'ooshe Lebanese Flatbread

Each month, I eagerly look forward to finding out which blog I am assigned to for The Secret Recipe Club.  This month was no exception.  I was assigned to Simply.Food, described as "a vegetarian kitchen dedicated to "simple" home cooking".

Secret Recipe Club

I'll admit, at first I was a little intimidated by the thought of a vegetarian blog, especially since Mike and I do eat meat.  As I browsed through the vast collection of recipes, I was still a bit intimidated because the majority of Nayna's recipes are Indian and contain quite a few ingredients that I am not familiar with.  However, I pushed my initial intimidation aside and decided to branch out and try something I might not have attempted otherwise.

I made my usual list of recipes that looked delicious.  When it came time to narrow down my list, I was drawn to the recipe for Man'ooshe Lebanese Flatbread.  This flatbread is widely available in Lebanon and is often topped with a spread called Za'tar, vegetables, salads, or it can be used as a base for a pizza.  With options like that, I simply couldn't resist trying it!

I found the flatbread to be quite simple to make.  I choose to make mine slightly larger that Nayna's recipe, so I ended up with 8 flatbreads.  I think mine were the perfect size though!  I served my flatbread for dinner the other night.  My friends and husband absolutely loved it.  I'll be sharing the recipes I used to fill the flatbread later this week.
Man'ooshe Lebanese Flatbread

Makes 8

You will need:
3 cups flour
1 teaspoon salt
1 teaspoon sugar
1 teaspoon quick yeast
1 cup hot water (100-110 degrees)
1 tablespoon olive oil
1 teaspoon garlic paste

1. In a large bowl combine the flour,salt, yeast and sugar.

2. Add the water a little at a time and mix to make a dough that is soft and pliable.

3.Transfer the dough to a floured surface and knead for 2-3 minutes gradually adding the oil until it is combined and a soft dough is formed.

4. Return the dough to the bowl and cover with a clean towel.  Set it aside in a warm place to rise until double, about 2-3 hours.

5. Once the dough has risen, remove it from the bowl and place it on a floured surface.

6.  Add the garlic paste and  knead again for 2-3 minutes.

7. Dive the dough into 8 pieces and roll each out into a 8 inch round.  (Or as round as possible!)

8. Heat a skillet or griddle and place the flatbread on it. Cook for 2-3 minutes, then flip it and cook for 2-3 minutes more until golden brown spots appear on it.  Repeat with remaining dough.

Source:  Simply.Food


Friday, June 15, 2012

Baby Cakes in a Jar


As I was thinking about planning the baby shower, I knew that I wanted to come up with something creative for the dessert.  I finally decided to make cupcakes in a baby food jars.  I was able to get some empty jars from a friend, so I scrubbed the label glue off the outside and they were perfect.

I will warn you that this idea became quite the adventure.  The ladies at the shower got quite a laugh when I told them about my cake fiasco!  I didn't think about compensating for the cake to expand and so I filled the little jars probably 3/4 of the way full.  When I peeked into the oven to check on them, the cake had expanded over the jar and most of them were sticking out about 2 inches above the jar.  They looked quite funny!  I was able to cut that portion off the cakes before I frosted them. 

My friend and her husband knew that they were expecting a baby girl, and they had already named her Esther Elizabeth.  I thought it was only fitting that the baby cakes be topped with an E!

Baby Cakes in a Jar

Makes approximately 24

You will need:
1 box of cake mix, prepared according to instructions on the box
1/4 cup butter, softened
4 ounces cream cheese, softened
2 cups powdered sugar
1 teaspoon vanilla extract
3-4 drops of food coloring
1 cup white chocolate chips

1.  Fill clean baby food jars 2/3 of the way with cake batter.

2.  Place jars on a rimmed baking sheet and bake at 350 for 18-20 minutes, until a toothpick inserted in the middle of a cake comes out clean. 

3.  While the cakes are baking, prepare frosting.  In a medium bowl, cream together butter and cream cheese.

4.  Beat in powdered sugar and vanilla until smooth.  Set aside.

5.  Melt chocolate chips in a microwave-safe bowl.  Spoon into an icing bag or a small ziploc bag.  If you're using the ziploc bag, snip the corner off so you can pipe the letters.

6.  Place a piece of waxed paper on a flat surface.  Pipe the chocolate into the desired shape or letter.  When you're done set them aside. 

7.  When the cakes are cooled, frost them as desired.

8.  Wait until shortly before serving to top the cakes with the chocolate shape or letter.

Wednesday, June 13, 2012

Cheesy Pigs-in-a-Blanket


When Mike and I got married, we were 1 of 5 young couples from our church who got married that year.  As you can imagine, there was a great deal of excitement and busyness as most of us were good friends and involved in aspects of each others weddings. 

The first couple to get married recently had a baby.  I was blessed to be able to host a baby shower for my friend Jodi, just a couple weeks before her baby girl was born.  It was an exciting time for us girls because this is the first baby in our group of friends.  We were able to gather a small group of friends to enjoy a brunch together to celebrate this new life.

I was in my element planning this shower as I was in charge of providing the majority of the food.  My best friend, Alecia, and I put a lot of thought into the food, decorations, and games.  We had a great time of food, fun, and fellowship.

Our menu included:
Cinnabon Copy-Cats
Egg Muffins
Fresh fruit salad
Cheesy Pigs-in-a-Blanket (recipe below)
5 Minute Fudge
Streusel Topped Blueberry Muffins
Baby Funfetti Cakes (recipe coming Friday!)

Cheesy Pigs-in-a-Blanket

Makes 24

You will need:
2 1/4 cups flour
2 teaspoons baking powder
1 teaspoon salt
4 tablespoons vegetable shortening, cut into 1/2-inch pieces
1 cup shredded cheddar cheese
1 1/2 cups heavy cream
1 large egg, lightly beaten
6 cheesy sausage links

1.  Add 2 cups of the flour, baking powder, salt to the bowl of a food processor. Pulse just to combine.

2.  Add the shortening and pulse until the mixture resembles coarse crumbs.

3.  Dump the mixture into a large bowl and stir in cheese until just combined.

4.  Add the cream and stir until the dough forms a ball.

5.  Turn the dough onto a lightly floured surface and knead until smooth.

6.  Roll the dough into a rectangle about 15" by 10".  You can add a little more flour to keep the dough from sticking, if necessary.

7.  Brush the dough all over with the egg. This will help to keep the dough and the sausage together.

8.  Cut the dough into 6 5" squares.  (Cut in thirds the long way, then in half the short way.)

9.  Place the remaining 1/4 cup flour in a shallow dish.

10.  Pat sausages dry with a paper towel and then roll them in the flour, shaking off any excess.

11.  Place the sausage at the edge of a dough square.  Then roll the dough around the sausage, pinching at the seam.  Repeat with remaining sausages.

12.  Cut each dough-covered sausage into 4 equal pieces and place on a parchment-lined baking sheet.

13.  Place the baking sheet in the freezer for 30 minutes to let the pigs get firm.  (At this point you can proceed to bake them, or transfer them to a freezer safe bag and freeze up to 1 month.)

14.  Bake frozen pigs at 425 degrees for 20-25 minutes, until the biscuits are lightly browned.

Cool slightly before serving.  Serve with ketchup for dipping, if desired. (I prefer mine plain!)

Source:  Tracey's Culinary Adventures

Monday, June 11, 2012

Pepperoni Pizza Bites


Pizza is one of our go-to meals around our house. I typically have all the ingredients in the house and if I have some dough already in the freezer, it's a relatively quick meal to make.  As you might guess, we also love any twist on pizza, like pizza bites, pizza rolls, pizza monkey bread, and pizza bread.

Everyone once in a while, Mike and I will have a "sample-platter" meal.  It's basically a random assortment of whatever we have in the house that sounds good--usually a lot of finger foods.  We don't do it too often because it tends to not be a healthy meal!  When I saw this recipe, I knew it would be a great addition to our next "sample-platter" meal.

These pepperoni pizza bites were so easy to make, and they were delicious!  I made a full batch of the cheese filling the first time I made these, but we didn't end up needing it all.  It made a great addition to Mike's lunch, as well as a delicious after-work snack for him.  It also made a delicious dip.  These would make a great lunch for kids this summer, and it's easy enough they could make it themselves!
Pepperoni Pizza Bites

Makes 20-30 servings

You will need:
8 ounces cream cheese, softened
1 cup shredded mozzarella cheese
1/4 cup pizza sauce
pepperoni slices
Town House crackers

1.  In a small bowl, mix cream cheese, mozzarella cheese, and pizza sauce until well combined.

2.  Place a couple tablespoons of the filling on one Town House cracker.

3.  Top with a pepperoni slice.

4.  Continue filling until all the cheese filling is used up.

Adapted from: Picky Palate

Thursday, June 07, 2012

Strawberry Cheesecake Smoothies

It's strawberry season and it's warm outside, so Mike and I are enjoying many delicious smoothies.  Sometimes smoothies are our after-dinner snack, other times they're my breakfast or lunch, and sometimes we even have smoothies for dinner.  Mike and I both love smoothies, and I'm more than happy to whip up a fresh and healthy snack when we're in the mood. 

I rarely follow a recipe for smoothies.  Instead, I pour a mixture of yogurt, milk, and fruit juice into the blender.  Then I add in a few handfuls of whatever fruits we happen to have on hand.  Sometimes I'll even add in a handful of spinach or kale.  When Tina announced that this month's Crazy Cooking Challenge was smoothies, I was a little surprised--I honestly didn't realize that most people follow a recipe for smoothies.  I decided this would be a good chance to find out how other people make their smoothies, compared to my smoothies made with whatever I have on hand.

Photobucket
My first attempt was a failure.  Neither Mike or I liked it at all!  When I told Mike on Sunday night that we were going to try another smoothie recipe, he was not impressed.  He requested that I "make smoothies like you normally do".  He likes my smoothies :)  But, I had to complete this challenge and I had found another recipe that sounded fabulous--a Strawberry Cheesecake Smoothie.  How could you go wrong with a name like that?

I found this recipe at Susan's blog, The Royal Cook.  She said it was a hit with her family, and I'm happy to say it was a hit with ours as well.  Mike said he wasn't too hungry when I made these, but he ended up drinking almost half of my smoothie.  I'd say he liked it!
ETA:  Thank you to everyone who voted for me.  My smoothie recipe was voted as the Ultimate Fruit Smoothie recipe for June's Crazy Cooking Challenge!
Photobucket

Strawberry Cheesecake Smoothies
Makes 2 large smoothies

You will need:
1 cup vanilla yogurt (I used Greek)
1 cup milk
2 ounces cream cheese (I used Neufchatel)
1 Tablespoon vanilla
1 banana, frozen
2 cups strawberries, frozen
Combine all the ingredients in your blender and blend until smooth.

Top with graham cracker pieces before serving, if desired.
Source: The Royal Cook

What is your favorite smoothie flavor?
Also, don't forget the ultimate recipe each month is the one that receives the most clicks.  Please click on the thumbnail picture for my recipe to vote for me!

Monday, June 04, 2012

Chicken Tortilla Bake

This is one of our favorite dinners.  It actually came about because I was short on time and ingredients and we needed dinner!  I went through the fridge and picked out a few ingredients, like left-over chicken, tortillas, and cheese.  Then I got to work, and this is what I came up with.  Mike and I both really liked this dish.  The tortillas absorbed some of the liquid from the soup and took on a noodle type texture.  It was very easy to make, and is on our regular dinner rotation now.

Chicken Tortilla Bake

Makes an 8x8" pan, serves 4-6

You will need:
8 flour tortillas
2 chicken breasts, cooked and shredded
1 can cream of chicken soup
1/2 cup sour cream
1/2 cup milk
1/4 cup shredded cheddar cheese

1.  Line the bottom of a greased 8x8" pan with 2 tortillas.  You will need to cut one in half to cover the entire bottom of the pan.

2.  In a medium bowl, mix together cream of chicken soup, sour cream, and milk until smooth.

3.  Spread 1/3 of the soup mixture over the tortillas.

4.  Sprinkle 1/3 of the shredded chicken over the soup.

5.  Top with 2 more tortillas, cut to fit the pan.

6.  Repeat soup, chicken, and tortilla layers 2 more times, ending with tortillas on top.

7.  Sprinkle tortillas with cheese.

8.  Bake at 350 for 25-30 minutes, until heated through.


What do you do with your left-overs?

Friday, June 01, 2012

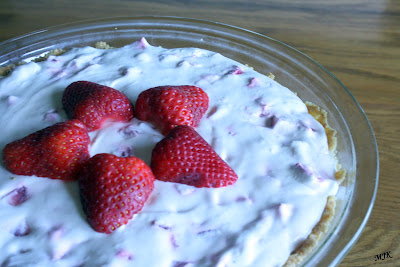
Strawberry Cream Pie

It's starting to warm up and really feel like summer-time here in Michigan.  Last weekend we enjoyed some hot weather--up around 90 degrees.  Today, it is much cooler and rainy, but that doesn't stop me from having summer-fever.  I love the warm weather, and of course, the delicious foods that come with summer.

This is my second year planting a garden.  Last year was what I call my "trial-run"...I was able to figure out what plants grow well and what plants are really worth the effort.  I have tomatoes, snap peas, celery, 2 kinds of lettuce, kale, cucumber, watermelon, and strawberries.  I have a few first year strawberries, and a few second year.  The other day, Mike and I were able to enjoy the very first strawberry from our own garden--it was delicious!  While I can't say I grew the strawberries used in this dessert myself, I did make the dessert and that's got to count for something...right?
Strawberry Cream Pie

Serves 8-10

You will need:

1 graham cracker crumb pie crust (store-bought, or make your own{directions below})
1 (8oz.) container Philadelphia White Chocolate Indulgence
1 (8oz.) container Cool-Whip, thawed
1 teaspoon vanilla 
1 quart of Strawberries

1.  In a medium bowl, beat cream cheese and Cool-Whip until smooth.

2.  Set aside 3-5 large strawberries for decoration and then dice the remaining strawberries into bite-sized pieces.  (I cut mine into quarters length-wise, and then cut each piece in half width-wise).

3.  Carefully stir diced strawberries into the cream mixture until evenly distributed.

4.  Spoon filling into the prepared pie crust.

5.  Refrigerate at least 4 hours, until pie is set, before serving.

6.  Garnish pie with set aside strawberries before serving.


Graham Cracker Crumb Pie Crust

Makes 1 8-9" pie crust

You will need:
10 graham crackers (approximately 1 package)
6 Tablespoons margarine, melted

1.  In your food processor, grind graham crackers into crumbs.  You may have to do this in a couple batches depending on the size of your food processor.  (If you don't have a food processor, place the crackers in a large Ziploc bag and crush them with a rolling pin.)

2.  Mix the margarine into the crushed crumbs.  This can be done in your food processor, or a separate bowl.

3.  Press the crumbs firmly into a pie tin.  Be sure to press it up the edges as well.

4.  Bake at 350 for 5-7 minutes, until lightly browned.

“I’m partying at the Pi Day Pie Party at Crazy for Crust today. Come party with us!”
01 10 11 12
Blogging tips