Melissa's Cuisine: June 2013

Friday, June 28, 2013

Independence Day Recipes

I know, you've probably heard it a million times this week, but can you believe that next week is already the Fourth of July?  As I mentioned the other day, I love Independence Day celebrations.  In my family, we always look forward to grilling and summer foods to keep us satisfied on July 4th.  I thought I would do a round-up of some of my favorite recipes to inspire your menu!

Main Dishes:
Ham and Egg Salad
Sweet and Spicy Chicken Rub
Grilled Marinated Chicken
Grilled Marinated Steak
Marinated Flank Steak
Bacon Cheeseburger

Side Dishes and Salads:
Grilled Asparagus

Grilled Corn
Bacon Ranch Potato Salad
BLT Pasta Salad
Macaroni Salad

Pesto Pasta with Peas and Sundried Tomatoes
Fruit Salad
Grape Salad
Cucumber Tomato Salad with Italian Dressing

Beverages:
Hawaiian Cocktail
Tropical Smoothie

Strawberry Banana Smoothie (In A Bag)

Sparkling Strawberry Lemonade
Desserts:
S'mores Bars

Berry Trifle
Festive Marshmallow Treat and Fruit Skewers

"That One Dessert" {Fruity S'mores Bowls}


Strawberry and Raspberry Cobbler
Blueberry Pie

Patriotic Fruit Pizza
What are your favorite foods to enjoy on Independence Day?

Wednesday, June 26, 2013

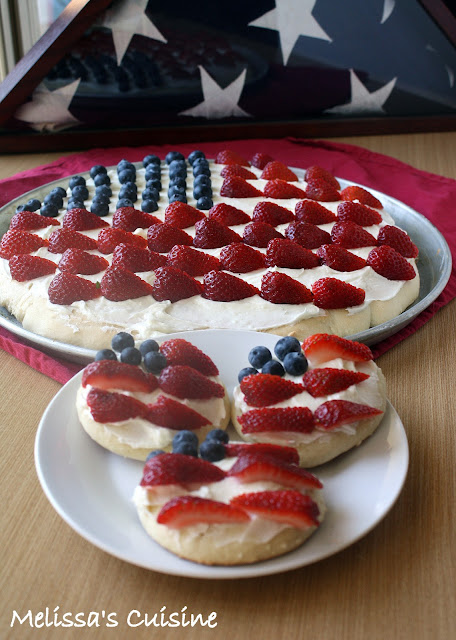
Patriotic Fruit Pizza

Melissa's Cuisine: Patriotic Fruit Pizza
Can you believe that it is already the last week of June?  This year has flown by!

I'm really looking forward to next week, not just because it's a short work week (Mike and I both have Thursday and Friday off--yay!), but also because it's one of my favorite holidays.  I love the 4th of July.  The parades, car shows, chicken lunch in the park, grilling for dinner, craft shows, and fireworks, plus the patriotic attitude of everyone around is just so exciting to me.
Melissa's Cuisine: Patriotic Fruit Pizza
Every year my hometown has a huge Independence Day celebration.  When I was in high school, I marched in the parade with the band.  Before then, I often walked in the parade with our church's float.  For the past few years, Mike and I have been able to go to the parade and just watch it.  Then everyone leaves the parade location and drives a couple miles down to the township park.  There are food vendors, crafters, a chain saw artist, and a huge car show.  There is also typically a children's play area set up.  I love how the community all comes together to celebrate--I think that's one of the reasons I love this holiday so much.
Melissa's Cuisine: Patriotic Fruit Pizza
After an afternoon in the park, Mike and I plan to head back to my parents for dinner.  You can't have 4th of July without grilling dinner!  At least not in my family...  This year will be especially fun because (for the second year in a row) my grandma will be visiting from Canada, so we'll be able to spend the whole day with her.  Then, if we can make ourselves stay awake, we'll head out to watch the fireworks.  Yes, it's a full day, but it's one filled with friends, family, and celebrating our freedoms!
Melissa's Cuisine: Patriotic Fruit Pizza
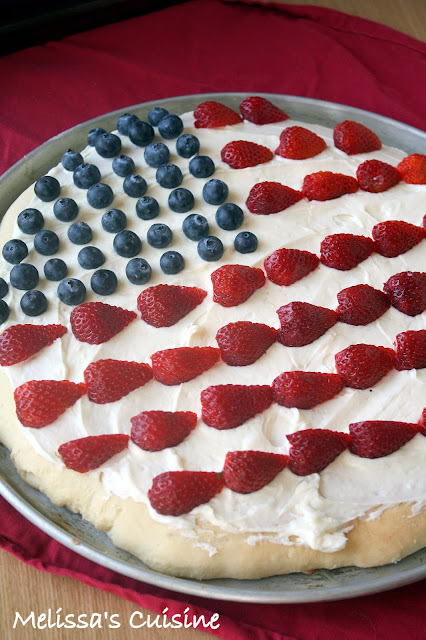
On Monday, I shared a recipe for Copy-cat Lofthouse Sugar Cookies and at the end of the post, I left a little teaser about what I made with the giant cookie.  If you haven't guessed it yet, I made this Patriotic Fruit Pizza.  I was inspired by my friend's open house, where she had a mini fruit pizza bar.  I knew that the combination of strawberries and blueberries would be the perfect topping for a fruit pizza, and what better way to design it than with a symbol of our freedom?
Melissa's Cuisine: Patriotic Fruit Pizza
Fruit Pizza

Makes 2 large pizzas (approximately 20 servings each) or 5-6 dozen individual cookies

Ingredients:
1 batch Copy-cat Lofthouse Sugar Cookie Dough
2 (8 ounce) packages cream cheese
2 (7 ounce) jars marshmallow cream
1 pint blueberries, washed
2 quarts strawberries, washed and hulled

1.  Prepare cookie dough and bake according to recipe directions for individual cookies.  For 2 large pizzas,  roll each half of the dough into a circle, about 1/2" thick and place on a greased cookie sheet.  Bake at 425 for 15-18 minutes, until lightly browned.

2.  Mix the cream cheese and marshmallow cream together until smooth.

3.  Spread frosting onto cookies/pizzas.

4.  Cut strawberries into quarters, lengthwise.

5.  Place blueberries in the upper left corner of each cookie.  Arrange strawberry pieces in horizontal lines, leaving space between each line (to form red and white stripes).

Store decorated cookies in an airtight container in the fridge.

**Just a note:  One batch of the cookie dough makes a lot of cookies.  If you don't want to make them all into fruit pizzas, just make what you want, and then freeze the remaining cookies.  That's what I did and it worked out great.  You can also make one large cookie and a bunch of small ones--the possibilities are endless!

Here's another patriotic snack for your Independence Day Celebration:
Melissa's Cuisine: Festive Marshmallow Treat Fruit Skewers
Festive Marshmallow Treat Fruit Skewers

Monday, June 24, 2013

Copy-cat Lofthouse Sugar Cookies

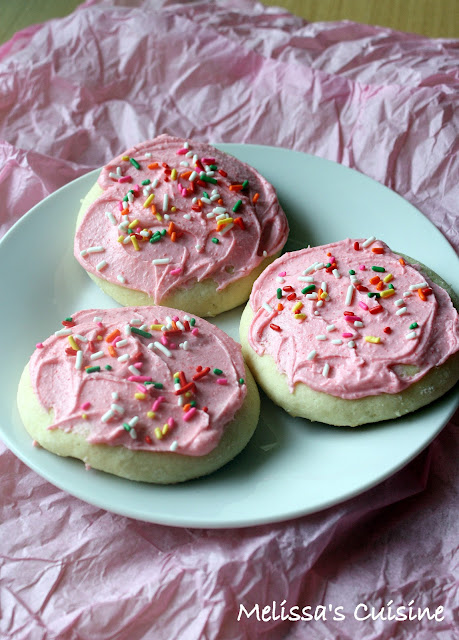
Melissa's Cuisine: Copy-cat Lofthouse Sugar Cookies
I must admit, I’m not a big fan of store-bought cookies.  My mom spoiled us growing up and we always had homemade cookies in the house.  In fact, one of my close friends would always come to our house right after school because he knew that my mom would have cookies and tea waiting for us!

There is one kind of store-bought cookies that I do really like though, those pillow-soft Lofthouse sugar cookies, topped with a sweet frosting and sprinkles!  Oh, the temptation every time I see them in the store!  I’m not sure what it is about the cookies, perhaps because they are so soft and flaky that they seem homemade, but I have a hard time resisting them.

Melissa's Cuisine: Copy-cat Lofthouse Sugar Cookies
I’ve had a recipe for copy-cat Lofthouse cookies pinned for quite some time now, but I finally had time to make them this weekend.  They require a bit of planning ahead as the dough needs to be refrigerated for at least 2 hours prior to rolling it out.  The dough comes together quite easily, and though it is very sticky, a little bit of flour makes it manageable to work with.  I made about 3 dozen regular sized cookies and one giant one, but you’ll have to come back on Wednesday to see what I did with the giant cookie!

Melissa's Cuisine: Copy-cat Lofthouse Sugar Cookies
Copy-cat Lofthouse Sugar Cookies

Makes 5-6 dozen cookies

Ingredients:

1 cup butter, room temperature
2 cups sugar
3 eggs
2 teaspoons vanilla
1-1/2 cups sour cream
6 cups flour
1 teaspoon baking powder
1 teaspoon baking soda
1/4 teaspoon salt

1.  In the bowl of your stand mixer, using the paddle attachment, cream the butter and sugar until light and fluffy, about 3 minutes.

2.  Add the eggs, one at a time, beating after each addition until it is incorporated.

3.  Add the vanilla and sour cream and beat until combined.

4.  Add the flour, baking powder, baking soda, and salt, and mix on low speed until combined.  The dough will be sticky.

5.  Divide the dough in half and flatten into 1-1/2 inch thick rectangles.  (It will help if you work on a floured surface and flour your hands.)  Wrap the dough in plastic wrap and refrigerate for at least 2 hours.

6.  Remove one of the dough rectangles from the fridge and unwrap it.  Place the dough on a floured surface and roll out to about 1/4 inch thick. 

7.  Use a 2-1/2” cookie cutter (I actually just use a drinking glass, so mine were probably closer to 3") to cut out cookies.  Place on a parchment lined cookie sheet.  It is best to work in small batches and keep the dough cold until you’re ready to work with it.

8.  Bake at 425 for 8 minutes, until the cookies are lightly browned.

9.  Allow the cookies to cool completely before frosting them.  (Frosting recipe is below.)  Decorate as desired.

Store in an airtight container at room temperature.  You can also freeze unfrosted cookies.

Frosting

Ingredients:

1 cup butter, room temperature
1 teaspoon vanilla
4 cups powdered sugar
6 Tablespoons heavy cream
Food coloring

1.  In the bowl of your stand mixer, fitted with the paddle attachment, cream together the butter and vanilla.

2.  Slowly beat in the powdered sugar until smooth and creamy.

3.  Mix in the heavy cream, one Tablespoon at a time, until the desired frosting consistency is achieved. 

4.  If desired, add in a few drops of food color and beat until evenly colored.

Store in an airtight container in the refrigerator.  Bring to room temperature before spreading.

Friday, June 21, 2013

Scotcheroos

Melissa's Cuisine: Scotcheroos
Sometimes simple really is better.  As much as I love to mess with recipes and make them unique, there's something special about a simple recipe.

Earlier this month, one of my good friends graduated from high school.  Yes, she might be 6 years younger than me, but we've never really noticed the age difference.  She asked me if I would help her prepare some of the snacks for her graduation open house.  We spent an evening making about 150 cupcakes and 4 big pans of scotcheroos.

It had been a long time since I'd had a scotcheroo, much less made them, but by the end of the night I had the recipe memorized.  The next day, all I could think about was scotcheroos.  It was a regular craving, multiplied by a pregnancy craving and I knew I had to have them!  I ventured to the basement to see if we had the ingredients to make a batch and surprisingly I did.  (I was worried I would not have the butterscotch chips.)  I was able to put together a batch before I left for work in the morning and by time I got home they were hardened and I could enjoy a big piece!
Melissa's Cuisine: Scotcheroos
Scotcheroos

Makes 1 9x13" pan

Ingredients:
1 cup sugar
1 cup corn syrup
1 cup peanut butter
6 cups Rice Krispies cereal
1 cup chocolate chips
1 cup butterscotch chips

1.  In a large saucepan, combine the sugar and corn syrup.  Heat over medium heat, stirring constantly, until the sugar is dissolved.  Continue stirring occasionally until the mixture begins to boil.

2.  Remove the sugar mixture from the heat and stir in the peanut butter.

3.  Add the cereal to the mixture and stir gently until the cereal is completely coated.

4.  Press the cereal mixture into a greased 9x13" pan.

5.  In a small saucepan, melt the chocolate chips and butterscotch chips, stirring until smooth.

6.  Spread the chocolate mixture over the cereal bars.

7.  Cool the bars for approximately 2 hours before cutting them.

Store, covered, at room temperature.


Wednesday, June 19, 2013

Shepherd's Pie

Melissa's Cuisine: Shepherd's Pie
Shepherd's Pie is Mike's favorite hot dinner.  It's a meal that he grew up eating, and his mom often made it for him and his dad.  In nearly 3 years of marriage, I'd never made him Shepherd's Pie.  Oops!

We were talking with a friend a couple weeks ago and both he and Mike got on the subject of Shepherd's Pie and how much they loved it.  I decided that it was high time I learn how to make Mike's favorite dinner!  I didn't have a recipe to go off of, so I just put the basic ingredients together that I knew were involved.  It all worked out, because Mike loved the Shepherd's Pie.

This recipe made a large dish full of the casserole.  It was enough for our dinner, plus 3 or 4 lunches for Mike to take to work.  This meal would also freeze well if you have too many leftovers!  I put the casserole together the night before we planned to have it for dinner and stored it overnight in the fridge.  The next day I had Mike put it in the oven and dinner was almost ready when I got home from work.

Shepherd's Pie

Serves 6-8

Ingredients:

1 pound ground beef, browned (drain the grease)
1 12 ounce package frozen mixed vegetables (I used Bird's Eye)
2 cans Cream of Mushroom Soup
5 medium potatoes, cooked and mashed
1/2 cup shredded cheddar cheese
salt

1.  In a 9x13" casserole dish, combine the cooked ground beef, mixed vegetables, and Cream of Mushroom soup.

2.  Spread the mashed potatoes over the meat and vegetable mixture.

3.  Bake at 350 for 40 minutes, until heated through.

4.  Sprinkle the shredded cheddar cheese on top of the potatoes and return to the oven for about 5 minutes, until the cheese is melted.

Serve hot, with salt to season as needed.

Monday, June 17, 2013

Peanut Brittle

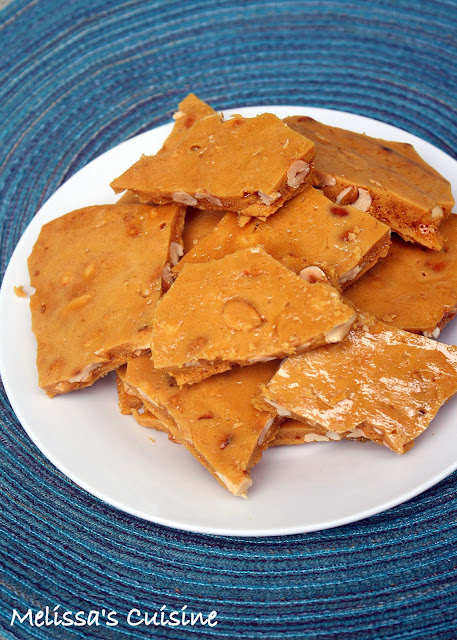
Melissa's Cuisine: Peanut Brittle
What a weekend!  Mike finally had Saturday off from work and we had plans for a lot of yard work that needed done around our house.  Apparently, it wasn't all meant to be, as Mike woke up not feeling well and then it rained most of the morning.  We were able to get a few things accomplished, but our list is still long.  Anyone up for some manual labor?

The plus side of the poor weather was that we got to enjoy some quality time together, including a date night!  It's been so long since we've done that.  Then on Sunday, we got to spend time with both of our fathers.  Quality time seems to be the best gift you can give someone, and I'm so thankful for both my dad and my father-in-law.

It just so happens that one of my dad's favorite snacks is peanut brittle.  It worked out perfectly because I found a delicious looking recipe on Gloria's blog, The Ginger Snap Girl.  I was able to make Peanut Brittle for my dad for Father's Day, as well as make the recipe from this month's Secret Recipe Club assignment.

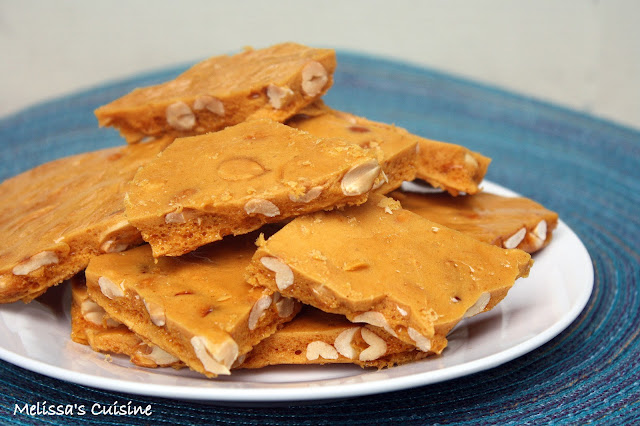
While there were quite a few delicious looking recipes on Gloria's blog, I'm really happy that I made this candy.  It came together perfectly, and has the perfect ratio of peanuts and candy.  I did leave out the cinnamon and cayenne pepper from Gloria's recipe, so I would have a more typical version of peanut brittle.  I believe this is the first time I've made peanut brittle (though I've helped my parents before) and I now have a go-to recipe for this candy!  Plus, my dad loved it, so I know it was good!
Melissa's Cuisine: Peanut Brittle
Peanut Brittle

Ingredients:
1 cup sugar
1/2 cup light corn syrup
1/4 teaspoon salt
1/4 cup water
1-1/2 cups peanuts
2 Tablespoons butter, softened
1 teaspoon baking soda

1.  In a medium saucepan, combine the sugar, corn syrup, salt, and water.  Cook, stirring constantly until the sugar is dissolved.

2.  Continue cooking the mixture, stirring frequently, until it reaches 275 degrees (use a candy thermometer to keep track of the temperature). 

3.  Add the peanuts to the sugar mixture and continue to cook until the temperature reaches 300 degrees.

4.  Remove the pan from the heat and immediately stir in the butter and baking soda. 

5.  Pour candy mixture onto a baking sheet that has been lined with parchment paper.  Spread with a greased spatula if necessary (mine spread out on its own).

6.  Cool the brittle for at least 3 hours, until hard, before breaking into pieces. 

Brittle can be stored in an airtight container at room temperature.  However, if it is humid (like my house was), I would recommend storing the brittle in the fridge, otherwise it will become sticky!

Source: The Ginger Snap Girl

Thursday, June 13, 2013

Strawberry & Raspberry Cobbler

Melissa's Cuisine: Strawberry & Raspberry Cobbler

What is your favorite season?  Mine--without question--is summer.  I love the warmth, the longer days, trips to the beach, and the food!  Summer brings an abundance of fresh fruits and vegetables.  I enjoy going to the farmer's market on Saturday mornings and keeping and eye on my garden as I watch my plants grow.

We're at the very beginning of strawberry season around here, and it's starting to show at the farmer's market.  Berries are quite expensive now, but as the season gets into full swing, the prices will go down.  Typically I go strawberry picking each summer, but I don't think that's going to happen at 8.5 months pregnant!  Good thing I have the farmer's market...
Melissa's Cuisine: Strawberry & Raspberry Cobbler

This month's Lady Behind the Curtain Dessert Challenge brought together two of my favorite summer berries--strawberries and raspberries.  Typically I enjoy my fruit fresh and plain, but for this challenge, I had to put them into a dessert.  I decided to make a dessert similar my Strawberry Rhubarb Cobbler and make a Strawberry Raspberry Cobbler.

This cobbler is chock full of plump red berries.  They're sprinkled with a little bit of sugar and then dotted with a bit of butter.  A thin batter is poured on top of the berries before baking.  It really creates the perfect ratio of berries to cake.  I made this cobbler twice in one week--the first time with just strawberries and the second time with both strawberries and raspberries so I could use it for this challenge.  I didn't share the first pan with anyone, but I thought I better be nicer the second time around :)
Melissa's Cuisine: Strawberry & Raspberry Cobbler

Strawberry and Raspberry Cobbler

Serves 6

Ingredients:
1 quart strawberries, washed and hulled
1 pint raspberries
1 Tablespoon sugar
2 Tablespoons butter
1 cup flour
1 teaspoon baking powder
3/4 cup sugar
1 cup milk

1.  Slice the strawberries into thick slices and place in a greased 9x9" pan.

2.  Place the raspberries on top of the strawberries.

3.  Sprinkle berries with 1 Tablespoon of sugar.

4.   Dot the berries with small pieces of butter.

5.  In a medium bowl, mix the flour, baking powder, sugar, and milk until just combined.

6.  Pour the batter evenly over the berries.

7.  Bake at 350 for 1 hour, until golden brown.

Slightly adapted from: The Kitchen is My Playground

Monday, June 10, 2013

A Fla-Vor-ful Summer Snack

This post brought to you by Jel Sert. All opinions are 100% mine.

School's out for the summer!  I'm sure there are hundreds of kids in my area waking up this morning (after sleeping in) excited for the first day of summer vacation.  This time of the year brings so much excitement for both kids and adults.

One of my favorite summer traditions from childhood took place on the last day of school.  In the development where I grew up, we had the best school bus driver.  On the last day of school, she would treat her kids to popsicles at the bus stop.  We would line up for our Fla-Vor-Ice pop and the bus stop moms would cut the ends off for us so we could enjoy our choice of flavors.  It's both a kid and "mom approved" snack.

Fla-Vor-Ice has been around since 1969 and has been a favorite of kids for over 40 years.  There's a Fla-Vor-Ice pop for everyone as it comes in Original Fruit Flavors, Tropical Flavors, and even Sugar-Free Flavors.  Not only do Fla-Vor-Ice pops taste great (did you know they're low in sugar and calories and made with real fruit juice?) but they are also budget friendly. 

I know many of my friends who keep their freezers stocked with Fla-Vor-Ice pops.  Mike and I enjoy these pops on hot summer days.  After he has been working out in the yard, we often relax on the porch with a icy  popsicle.  I know I will continue to have our freezer stocked with these convenient treats, especially once our daughter is able to enjoy them!  In fact, Mike's boss has even been known to pass Fla-Vor-Ice pops out around the warehouse on hot summer days.  These convenient snacks are loved by kids, and kids-at-heart!

If you are a fan of Fla-Vor-Ice, I'd encourage you to like Fla-Vor-Ice on Facebook.  It's filled with fun images and information so you can keep up with their latest news!

Visit Sponsor's Site

Saturday, June 08, 2013

50+ Blueberry Recipes


Melissa's Cuisine:  50+ Blueberry Recipes
On Monday I was preparing my recipe posts for this week and realized that all three of my planned recipes included blueberries.  That realization prompted me to declare this week Blueberry Week.  I thought I would follow in the steps of last week's Smoothie Week and close with a Blueberry Recipe Round Up.  Thanks to the help of my blogging friends, I've compiled a list of over 50 delicious blueberry recipes.  I hope you enjoy it and are inspired to eat lots of blueberries this summer!

(If you would like to pin any of these individual recipes, please pin from the original post, not this round up.  Thanks!)
Melissa's Cuisine--Blueberry Pie

Melissa's Cuisine--Blueberry Peach Cobbler
Melissa's Cuisine--Blueberry Scones
Melissa's Cuisine--Festive Marshmallow Treat Fruit Skewers

Melissa's Cuisine--Blueberry Banana Muffins

Melissa's Cuisine--Sour Cream Blueberry Pancakes
Melissa's Cuisine--Blueberry Cinnamon Roll Cake
Melissa's Cuisine--Fruit Popsicles
Melissa's Cuisine--Giant Streusel Topped Blueberry Muffins
Melissa's Cuisine--Blueberry Muffins

Melissa's Cuisine--Blueberry Peach Cobbler
Happy Food, Healthy Life--Blueberries and Cream Brownies

Happy Food, Healthy Life--Blueberry Quick Jam

Happy Food, Healthy Life--Blueberry & Peach Salsa
Wine & Glue--Orange Blueberry Fruffins

The NY Melrose Family--Blueberry Lemonade Cupcakes


Je Suis Alimentageuse--Blueberry Spinach Super Smoothie

Je Suis Alimentageuse--Blueberry Squares

Je Suis Alimentageuse--Blueberry Lemon Bundt Cake

Frugal Foodie Mama--Blueberry Lemon Cream Cheese Muffins

Will Cook For Smiles--Blueberry Oatmeal Cookies

Will Cook For Smiles--Blueberry Mini Cheesecakes

Will Cook For Smiles--Stuffed Blueberry French Toast
Crazy Lou Creations--Melt in Your Mouth Blueberry Pancakes

This Gal Cooks--Blueberry Preserves

This Gal Cooks--White Chocolate Blueberry Bars
A Family Feast--Blueberry Buckle

The NY Melrose Family--Fruit Sparklers

Organized Island--Blueberry Coffee Cake


Frugal Antics of a Harried Homemaker--Citrus Blueberry Casserole

Frugal Antics of a Harried Homemaker--Blueberry Cheesecake Oatmeal

Frugal Antics of a Harried Homemaker--Blueberry Cardamom Pancakes

Hezzi-D's Books and Cooks--Blueberry Lime Jam
Crazy for Crust--Blueberry Pie Fudge
Food Babbles--Lemon Ricotta Pancakes with Fresh Blueberry Sauce
Food Babbles--Lemon Basil Blueberry Swirl Cake

Hezzi-D's Books and Cooks--Fruit Salad with Mojito Dressing

The Kitchen is My Playground--Blueberry Gingerbread Streusel Muffins
The Kitchen is My Playground--Dark Chocolate Blueberry Muffins
The Kitchen is My Playground--Refreshing Blueberry Lime Iced Tea
Jazzy Gourmet Cooking Studio--Banana Blueberry Bliss

Call Me PMc--Ultimate Blueberry Cheesecake

Cupcakes and Kale Chips--Grilled Chicken and Berry Salad


Cupcakes and Kale Chips--Gluten-Free Almond Blueberry Mini Muffins


Cupcakes and Kale Chips--Red, White and Blueberry Crumb Cake

Sweet Twist of Blogging--1st Place Blueberry Brownies
Sweet Twist of Blogging--Peach Blueberry Crumble Inside Pie

Julie's Eats and Treats--Fresh Blueberry Coffee Cake
Vegan Mother Hubbard--Lemon Blueberry Muffins
Vegan Mother Hubbard--Blueberry Poppy Seed Muffins

Mom on Timeout--Blueberry Buttermilk Pancakes

Crazy for Crust--Blueberry Slab Pie


01 10 11 12
Blogging tips